Reset Mikrotik Metal 2SHP

Terdapat problem pada hari Selasa tanggal 31/5/16 yang mana access point mikrotik yang sudah standby berbulan-bulan akan digunakan untuk media wifi camera. wifi ini menggunakan Mikrotik Metal 2shp, sebenarnya device sudah siap, tinggal client camera connect ke access point, problemnya adalah saya benar-benar lupa dengan password admin dari metal2shp.

Sudah berkali-kali mencoba login dengan list password milik saya namun belum bisa masuk, akhirnya menggunakan jalan satu-satunya yaitu reset device, sama halnya dengan produk jaringan yang lain cara reset yaitu dengan menusuk lubang reset bersamaan dengan memasukan power, namun beberapa kali tidak berhasil untuk mereset, sampai akhirnya menemukan tutorial dengan mereset menggunakan netinstall.

Dari metode tutorial reset dengan netinstall sepertinya metode ini lebih tepatnya disebut dengan menginstall kembali firmware, karena dari stepnya kita harus memiliki firmware mikrotik. Berikut langkah-langkah reset menggunakan netinstall :

  1. Pertama-tama silahkan download netinstall, bisa langsung masuk ke page download milik mikrotik disini.
  2. kemudian setelah install netinstall, download firmware dari mikrotik, sesuaikan dengan seri produk mikrotik.
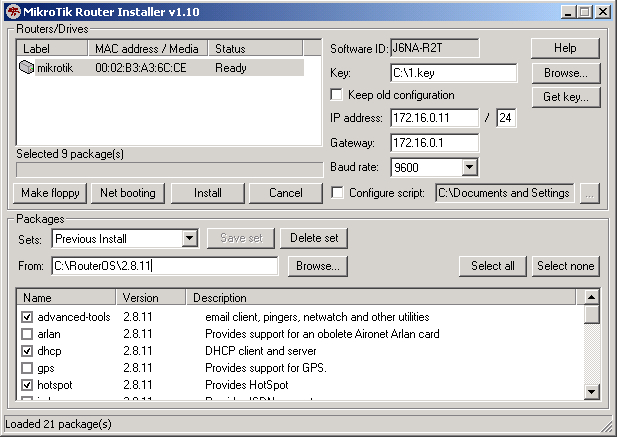
  3. Buka aplikasi netinstall, pilih netbooting
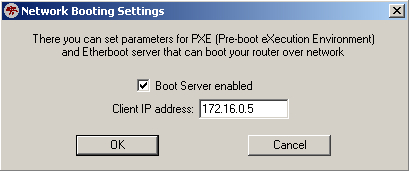
  4. kemudian check pada “Boot Server enabled”, kemudian masukan ip address (ip address ini beda dengan ip address komputer dan ip address mikrotik yang penting satu segment), kemudian ok.

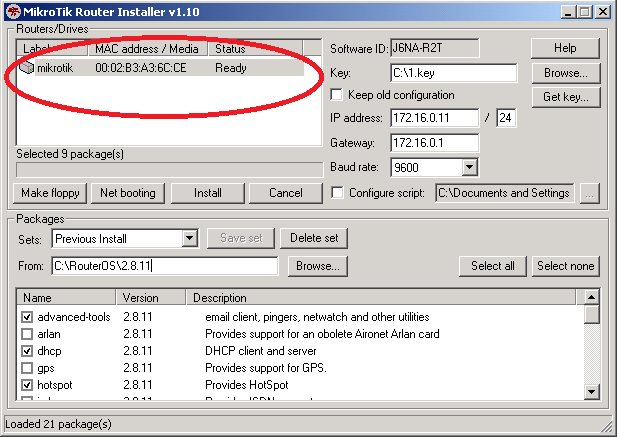
5. Setelah itu, tekan tombol reset kemudian lepas kabel power (tombol reset tetap ditekan), kamudian masukan kabel power kembali , tetap masih menekan tombol reset, setelah terlihat pada list list routers/drivers, lepas tombol reset.

netinstall

6. kemudian masukan package firmware yang telah kita download di awal, klik browse kemudian bila ingin konfigurasi tidak hilang check pada pilihan “keep old configuration”, kemudian klik install.

7. bila telah berhasil coba login menggunakan winbox dengan menggunakan mac address mikrotik.


Install DJBDNS

Install DNS Server

Dapat tugas buat DNS server di kantor.

Kebetulan dari referensi yang ada jatuh pada DJBDNS, DNS milik D.J Bernstein.

Coba install Diubuntu sangat gampang paket yang diinginkan sudah langsung lengkap,

Tinggal ketik

# apt-get install djbdns dnscache-run

Untuk menjalankan daemontools tinggal ketik : /sbin/start daemontools

Oke ini untuk yang ubuntu paket sudah terinstall tinggal setting aja.

Untuk tidak menggunakan ubuntu perlu sedikit effort yang lebih untuk menginstall pake secara manual,

Ditulisan saya sebelumnya sudah saya sampaikan di sini.


Sekarang setting DNSCache:

# echo 10.10.50.110 >/etc/dnscache/env/IP
# touch /etc/dnscache/root/ip/10.10
# chmod 0600 /etc/dnscache/root/ip/10.10
# svc -t /etc/service/dnscache
# perl -p -i -e ‘s/nameserver 127.0.0.1/nameserver 10.10.50.110/’ /etc/resolv.conf

Kemudian Untuk Setting Tinydns

Buat user untuk log

adduser –no-create-home –disabled-login –shell /bin/false dnslog

adduser –no-create-home –disabled-login –shell /bin/false tinydns


untuk konfigurasi

tinydns-conf tinydns dnslog /etc/tinydns/ 10.10.50.110

kemudian inisialisasi ke service

mkdir /etc/service

cd /etc/service

ln –sf /etc/tinydns

Untuk menjalankan service

initctl start svscan

Untuk check service

Svstat /etc/service/tinydns

Untuk stop service

Svc –d /etc/service/tinydns

Untuk start service

Svc –u /etc/service/tinydns

Implementasi Spaning Tree Protocol di Kantor

Spanning Tree Protocol merupakan protocol yang menurut saya yang masih newbe bikin pusing, menurut saya, data udah komunikasi ya udah,,habis urusan, ternyata..

Sebelumnya ayo kita sama-sama berkenalan dengnan STP (spanning tree protocol),

STP digunakan oleh bridge atau switch untuk mencegah terjadinya network loop.

Network Loop adalah suatu kondisi dimana frame-frame “berputar” tanpa henti pada network.

Masih bingungkan….

Dari referensi yang saya dapat , STP menggunakan standart IEEE 802.1d dan dibagi menjadi 2, yaitu RSTP dan MST.

Oke kita bahas pelan-pelan.

  • RSTP ( Rapid Spanning Tree Protocol) IEEE 802.1w. Kalo STP menangani transisi dari kondisi aktif menuju kondisi forward kesetiap port daam waktu 30 hingga 180 detik, sedangkan RSTP dapat mempersingkat waktu tsb
  • MST ( Multiple Spanning Tree ) IEEE 802.1s. Switch yang mendukung vlan umumnya mendukung spanning tree per vlan, bayangkan bila vlan ratusan, maka akan banyak proses yang terjadi. MST disini berfungsi untuk menggabungkan beberapa vlan yang memiliki topology yang sama sehingga dapat menghepat tenaga switch .

Istilah yang banyak ditemui dalam membahas tentang STP;

  • ROOT BRIDGE atau ROOT, bridge / switch dengan ID terbaik. Peblokiran atau forward data akan ditinjau dari sitch root bridge
  • BRIDGE ID, nomor id dari switch, default dari cisco adalah 32.768. switch dengan id terkecil akan menjadi root bridge
  • Nonroot bridges, semua switch selain root bridge
  • Port Cost, jika dua buah switch dihubungkan dengan beberapa link, maka link dengan port cost terendah (bandwith terbesar) yang menjadi tolak ukur COST
  • ROOT port, link yang terhubung langsung dengan port bridge
  • Designed port, port dengan cost terbaik , akan ditandai sebagai forwarding port
  • Nondesigned port, ya kebalikan dari designed port
  • Forwarding port, port yang digunakan untuk memfoward frame
  • Blocked port, port yang di blok untuk mencegah terjadinya loop network, yang memblok STP itu send

Mei / 2014

Setting Mikrotik untuk publik wifi, buat paket dengan extention di layer  7 kemudian di masuk di mangle kemudian di mark paket kemudian di queuee tree

coba reset catalyst 1.57 untuk memastikan problem di catalyst 6000

PM catalyst sekalian rapikan console nya.

07/05/2014

* Inventaris WIFI ASUS, problem solve beberapa AP yang tidak terdaftar telah di temukan

* Knowledge Management Non Direction Beacon (pak Edwi Rachmad)

* Solve Problem Backup

08/05/2014

*Solve Problem Wifi Tojasera (problem pada lease pool dhcp)

* Develop Kolam renang wifi pubic

* Implementasi Mikrotik Router PC di PROXY access

09/05/2014

*LUPA

12/05/2014

*suport seperti biasa

*improve mikrotik


Linux

Install Lusca di Ubuntu

Membuat DNS dengan djbnds

install DJBDNS

Proxy ane jalan

Setting Ubuntu

Problem squid warning your cache is running out

Problem squid Linux Increase The Maximum Number Of Open Files / File Descriptors (FD)

FTP server for Ubuntu

install paket ini sebelum lanjut ubuntunya

install squidguard

install bekerlydb

Merubah resolusi ubuntu dengan GRUB2

insert default gateway di linux

to change all directory /sub

install JRE di mandriva

install httpd / apache2 di mandriva

managing group

user add linux

memindahkan file ke upper folder

tranfer file ftp rekursive

melihat service

change home directory

set default permission folder

instsall minicom di ubuntu

Private address

install samba di ubuntu

install lamp server jaunty

membuat simple file sharing dengan samba

install DHCP server di ubuntu

Menambahkan attribute di LDAP

Using and Creating Custom Fields
1. Open ConsoleOne and highlight an NDS OU.
2. Go to Tool/Schema Manager.
3. Select the Attribute Tab
4. Select Create then select next
5. Put in Attribute Name you wish to create. You can leave the ASN1 ID field blank, then select next
6. For Syntax drop down list choose the Case Ignore String and select next
7. For the Tag field check Single Value only and select next
8. Then select Finish
9. If the item does not show, close the Schema Manager and reopen.
10. In Schema manager go to the Class Tab scroll down find User
11. Select ADD and find in the “Available attributes field” the name of the attribute you created and move it to the “Add this attribute side” select ok and close.
12. Now Create the Admin defined field for the domain in GroupWise (if not already created by following step 13)
13. In ConsoleOne, right click the domain object, choose Properties.
14. Click on the on the GroupWise tab drop down and choose Address Book , then click the Map Additional Fields button. This will list the Administrator Defined Fields.
15. Click on an Admin Defined field that says “admin defined 2 in the NDS Property column (do not use admin defined 1 as there have been known issues with this entry.)
16. Click on the Edit button to edit this field and select the user property that you created and would like associated with the Admin Defined field.
17. Click on OK twice. The NDS user property you selected will now show in the Available Fields box and you will need to select it to move to the Address book fields side (from right to LEFT). This step should be preformed on every domain you would like to have the address book column available to.

If replication fails to occur
1. A rebuild should automatically kick off and update the indexes for the domain but to insure this is down and in the event it does not happen automatically | right click on the domain object | choose GroupWise utilities | system maintenance and choose to rebuild addresses for listing then click run.
2. Now rebuild each post offices addresses for listing by right clicking on the post office in ConsoleOne | choose GroupWise utilities | system maintenance and choose to rebuild addresses for listing then click run.

To Populate Data in newly created Fields
1. Go to each user you wish to populate this new field. In the properties of the user select the other tab.
2. Highlight the word Attribute and click the Add button, find the attribute you created highlight it and click OK. Your attribute will now show up under the “page for Left over attributes that are not handled by custom pages.” You can add the desired information and close the properties of the user object.
3. Repeat the above step #1 and #2 of this section, for every user in the system to populate the new field.
4. Log in as a user with the GroupWise Client to add the column to the users address books. If the client was previously left open you will need to close and re-login.
5. In the GroupWise Client click Tools | Address Book | Edit columns and choose more columns.
6. From the left side available columns list add the admin define column you create and move it to the selected columns on the right side